Db2 for i
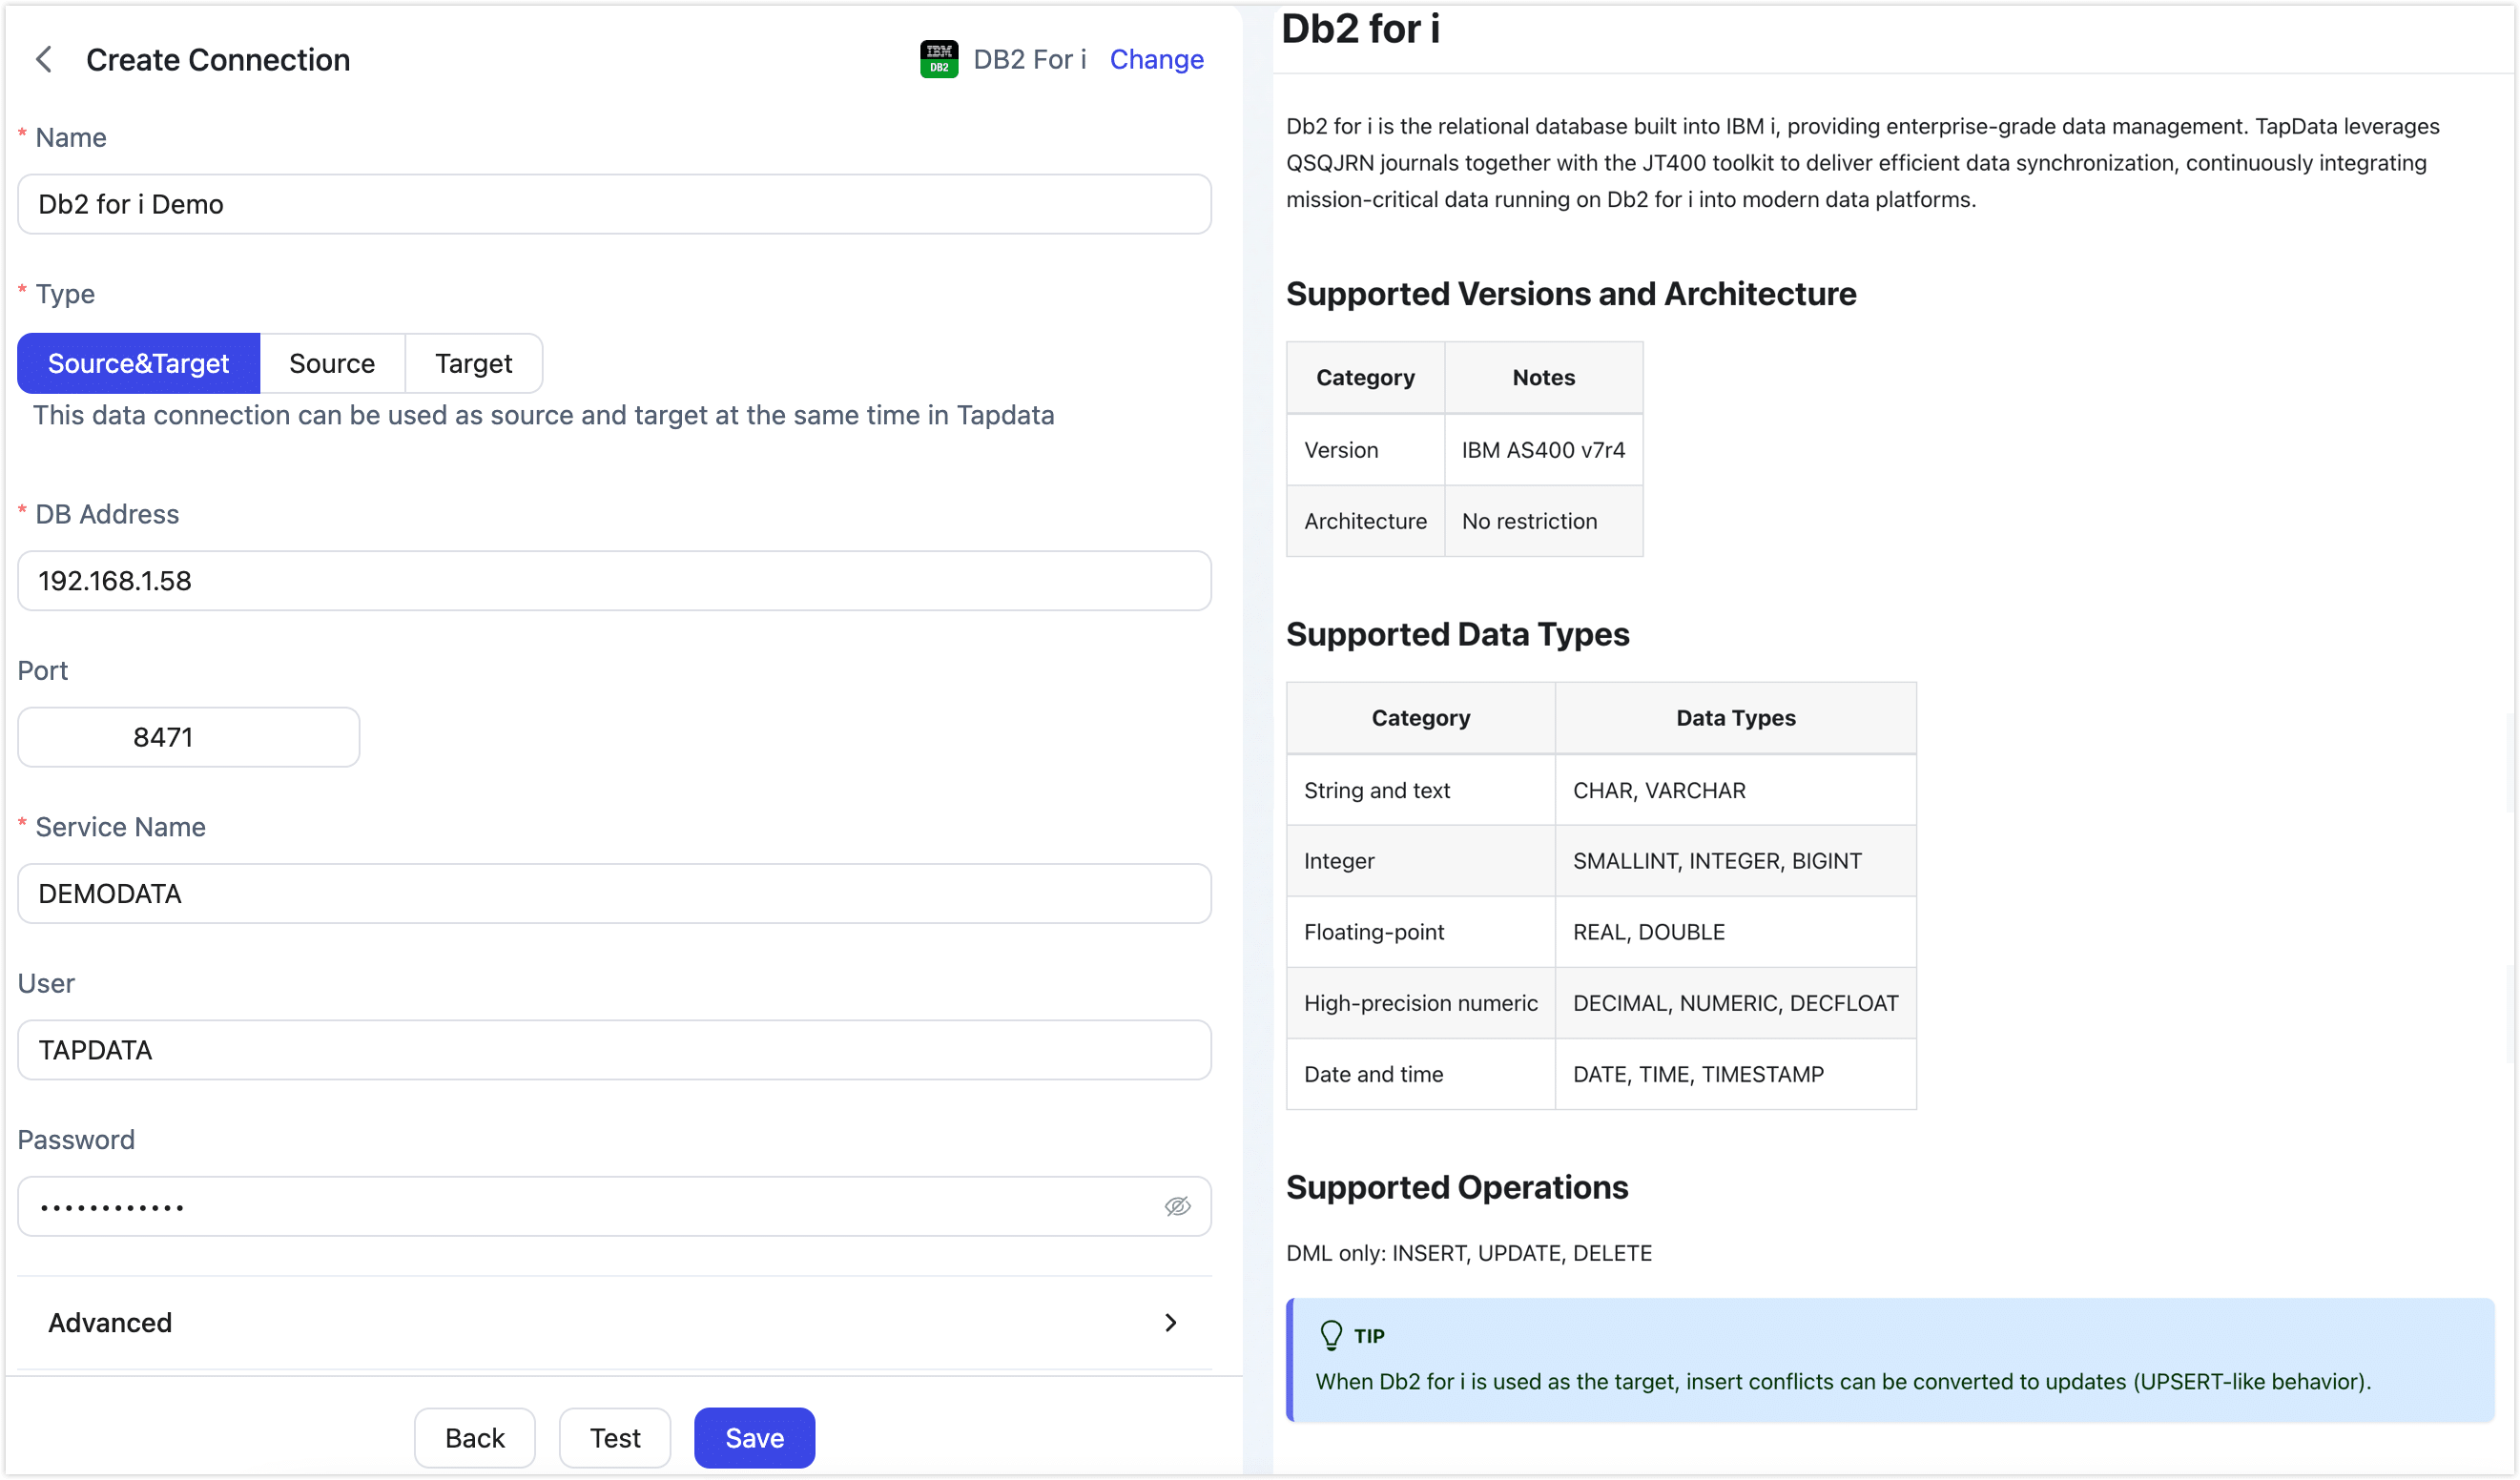
Db2 for i is the relational database built into IBM i, providing enterprise-grade data management. TapData leverages QSQJRN journals together with the JT400 toolkit to deliver efficient data synchronization, continuously integrating mission‑critical data running on Db2 for i into modern data platforms.
Supported Versions and Architecture
| Category | Description |
|---|---|
| Version | IBM AS400 v7r4 |
| Architecture | No restriction |
Supported Data Types
| Category | Data Types |
|---|---|
| String and text | CHAR, VARCHAR |
| Integer | SMALLINT, INTEGER, BIGINT |
| Floating‑point | REAL, DOUBLE |
| High‑precision numeric | DECIMAL, NUMERIC, DECFLOAT |
| Date and time | DATE, TIME, TIMESTAMP |
SQL Operations for Sync
DML only: INSERT, UPDATE, DELETE
When Db2 for i is used as the target, insert conflicts can be converted to updates (UPSERT‑like behavior).
Considerations
- When Db2 for i is the source and incremental reading is enabled, provide TapData with a dedicated Library to temporarily store journal data. If the connection user has
CRTLIBprivilege, TapData will automatically create the Library during connection testing or when a task starts. You can also create it manually with:CRTLIB LIB(TAPLIB) TEXT('TapData journal transit station') - During incremental capture, Db2 for i commands and SQL statements are executed with multiple threads to read journal logs. This adds some load to the database and consumes network bandwidth and disk I/O.
Prerequisites
Before connecting to Db2 for i, complete account creation and authorization. The examples below use IBM i 7.4.
As a Source
-
In the IBM i command-line environment (accessible via a 5250 terminal session or IBM ACS terminal), run the following CL command to create the user:
# Replace the account and password with actual values
CRTUSRPRF USRPRF(TAPDATA) PASSWORD(Your_Password)
USRCLS(*USER) TEXT('Test User') SPCAUT(*NONE) INLPGM(*NONE)
INLMNU(*SIGNOFF) LMTCPB(*YES)

# Optional: Delete the user if no longer needed
# DLTUSRPRF USRPRF(TAPDATA) OWNOBJOPT(*DLT) -
Grant privileges to the newly created user.
- Full Data Sync
- Incremental Data Sync
In the IBM i command-line environment (accessible via a 5250 terminal session or IBM ACS terminal), run the following CL command to grant privileges on the business library and its objects (replace
TESTCDCwith your actual library name):# Grant USE privilege on the library
GRTOBJAUT OBJ(TESTCDC) OBJTYPE(*LIB) USER(TAPDATA) AUT(*USE)
# Grant USE privilege on all objects in the library
GRTOBJAUT OBJ(TESTCDC/*ALL) OBJTYPE(*ALL) USER(TAPDATA) AUT(*USE)Then, in an SQL client or STRSQL, grant the account read access to the system-catalog tables and functions used for journaling.
-- Replace TAPDATA with the account you created earlier
GRANT SELECT ON QSYS2.OBJECT_PRIVILEGES TO TAPDATA;
GRANT SELECT ON QSYS2.SYSTABLES TO TAPDATA;
GRANT SELECT ON QSYS2.SYSCOLUMNS TO TAPDATA;
GRANT SELECT ON QSYS2.SYSKEYCST TO TAPDATA;
GRANT SELECT ON QSYS2.SYSINDEXES TO TAPDATA;
First, from the IBM i command line (5250 or IBM ACS terminal), run these CL commands to create the TapData work library and set permissions.
# Create the TapData work library
CRTLIB LIB(TAPLIB) TEXT('TapData Working Library')
GRTOBJAUT OBJ(TAPLIB) OBJTYPE(*LIB) USER(TAPDATA) AUT(*ALL)
CHGOBJOWN OBJ(TAPLIB) OBJTYPE(*LIB) NEWOWN(TAPDATA)
# Replace TESTCDC/QSQJRN with the Library and Journal that hold the journal receiver
GRTOBJAUT OBJ(TESTCDC/QSQJRN) OBJTYPE(*JRN) USER(TAPDATA) AUT(*USE)
GRTOBJAUT OBJ(TESTCDC/QSQJRN) OBJTYPE(*JRN) USER(TAPDATA) AUT(*OBJEXIST)
GRTOBJAUT OBJ(QSYS/DSPJRN) OBJTYPE(*CMD) USER(TAPDATA) AUT(*USE)
Then, in an SQL client or STRSQL, grant the account read access to the journal-catalog tables and functions.
-- Replace TAPDATA with the account you created
GRANT SELECT ON QSYS2.SYSSCHEMAS TO TAPDATA;
GRANT SELECT ON QSYS2.JOURNAL_INFO TO TAPDATA;
GRANT SELECT ON QSYS2.JOURNAL_RECEIVER_INFO TO TAPDATA;
GRANT EXECUTE ON FUNCTION QSYS2.DISPLAY_JOURNAL TO TAPDATA;
As a Target
-
In the IBM i command-line environment (accessible via a 5250 terminal session or IBM ACS terminal), run the following CL command to create a user:
# Replace the account and password with actual values
CRTUSRPRF USRPRF(TAPDATA) PASSWORD(Password)
USRCLS(*USER) TEXT('TapData Connector User') SPCAUT(*AUDIT) INLPGM(*NONE)
INLMNU(*SIGNOFF) LMTCPB(*YES) -
Grant write privileges to the newly created user.
Run the following CL commands on IBM i (replace
TESTCDCwith your actual library name):GRTOBJAUT OBJ(TESTCDC) OBJTYPE(*LIB) USER(TAPDATA) AUT(*ALL)
GRTOBJAUT OBJ(TESTCDC/*ALL) OBJTYPE(*FILE) USER(TAPDATA) AUT(*ALL)
Enable TLS/SSL
-
Turn on TLS/SSL for the Db2 for i database server.
Db2 for i listens on two ports by default: 8471 (clear) and 9471 (TLS/SSL). Be sure the firewall allows both, and enable TLS/SSL for the Database Server, Remote Command Server, and Signon Server.
-
Import the server certificate to the TapData host to prevent man-in-the-middle attacks:
# Import the exported db2i.cert into a new PKCS12 file
keytool -import -alias DB2ICERT -file db2i.cert -keystore DB2I_TAP.p12 -deststoretype PKCS12
# List the imported certificate
keytool -list -v -keystore DB2I_TAP.p12 -storetype PKCS12 -storepass changeit
Connect to Db2 for i
-
Log in to TapData platform.
-
In the left navigation bar, click Connections.
-
On the right side of the page, click Create.
-
In the dialog, search for and select Db2 for i.
-
On the redirected page, fill in the Db2 for i connection details as described below.
-
Connection Settings
- Name: Enter a unique name with business significance.
- Type: Specify whether Db2 for i is used as a source or target.
- DB Address: Enter the database connection address.
- Port: The service port for the database, default is 8471.
- Service Name: Enter the database (Library) name.
- User, Password: Enter the database username and password.
- Journal Name: The journal object (JRN) that captures changes; defaults to QSQJRN in the current library.
- Libraries created with CREATE SCHEMA or CREATE DATABASE already have QSQJRN—leave blank.
- Libraries created with CRTLIB do not—enter the custom journal name.
- Library Storing Journal: The library that owns the journal object; must match the library portion of Journal Name.
- Libraries created with CREATE SCHEMA or CREATE DATABASE already have QSQJRN—leave blank.
- Libraries created with CRTLIB do not—enter the library that contains your custom journal.
- TapData Work Library: Temporary library used to stage incremental data; defaults to TAPLIB. It must be readable and writable by the TapData user. Create it as described in Prerequisites or supply another name.
-
Advanced Settings
- Other Connection String Parameters: Optional extra parameters. If TLS/SSL is enabled, complete the prep steps and add
secure=true;tls truststore=/DB2I_TAP.p12;tls truststore password=changeit, replacing/DB2I_TAP.p12with the real PKCS12 path. - CDC Log Caching: Extract the incremental logs from the source database. This allows multiple tasks to share the incremental log extraction process from the same source, reducing the load on the source database. When enabled, you also need to select a storage location for the incremental log information.
- Include Tables: By default, all tables are included. You can choose to customize and specify the tables to include, separated by commas.
- Exclude Tables: When enabled, you can specify tables to exclude, separated by commas.
- Agent Settings: The default is automatic assignment by the platform. You can also manually specify an Agent.
- Model Load Time: If there are less than 10,000 models in the data source, their schema will be updated every hour. But if the number of models exceeds 10,000, the refresh will take place daily at the time you have specified.
- Enable Heartbeat Table: When the connection type is Source or Source and Target, enable this feature. TapData creates and periodically updates
_tapdata_heartbeat_tablein the source (requires write privileges) to monitor connection and task health. The heartbeat task is automatically enabled only after a task referencing the source starts. You can view its status on the edit page of the data source.
- Other Connection String Parameters: Optional extra parameters. If TLS/SSL is enabled, complete the prep steps and add
-
-
Click Test, and after it passes, click Save.
tipIf the connection test fails, resolve issues following the on‑screen guidance.
Node Advanced Features
When configuring a data sync or transformation task with Db2 for i as the source node, TapData provides advanced features to better handle complex requirements and maximize performance. Configure them as needed:

Hash Split: When enabled, during full load the table is split into multiple shards by hash and read concurrently. This significantly improves read throughput and speeds up the full load, but increases database load. You can set the maximum number of shards after enabling.